Set your alerts (optional)
TradingView can send the Navigator's signals to your phone or inbox — any instrument in your plan, on any timeframe you choose.
All steps
Our Telegram groups already send signals for the instruments on our list, so this step is optional. Alerts are for going beyond that — any instrument in your plan, on any timeframe you choose, delivered by TradingView itself.
How alerts reach you
TradingView delivers each alert two ways — a notification on your phone through the TradingView app, and an email to your inbox. You choose one or both when you create the alert; either way it carries the full signal, with the price and the take-profit and stop-loss levels.
A notification from the TradingView app, the moment the signal fires.
The same signal in your inbox, sent by TradingView.
How many alerts can you have?
TradingView counts alerts by instrument: an alert on Gold (XAUUSD) is one technical alert, an alert on EURUSD is another. How many you can run at once depends on your TradingView plan:
The free Basic plan can’t create any — one more reason the free TradingView Premium through Pepperstone is worth claiming. On Premium, 400 is more than you’ll ever need, and there’s a shortcut worth knowing: click a watchlist’s title, choose Add alert on the list, and one alert covers every instrument in it, all on the same timeframe.
Create an alert
- Make sure the Navigator is attached and the channel lines are showing (Step 5).
- Right-click anywhere on the chart and choose Add alert on [instrument] — the name matches whatever chart you’re on.
The alert window opens. Work it top to bottom:
- 1 Set the condition. Under Condition, choose RHO Navigator.
- 2 Set the trigger. In the dropdown below it, choose Any alert() function call — that covers every signal the Navigator sends.
- 3 Pick your timeframe. Under Interval, choose the timeframe you want watched. It doesn't have to match your chart.
- 4 Choose how you're notified. Under Notifications, pick the app notification for your phone, email for your inbox, or both.
- 5 Click Create. The alert starts watching straight away.
Manage your alerts
- Click Alerts — the alarm-clock icon in the panel on the right of the chart.
- Hover over any alert to stop or resume it, change its settings, or delete it.
What the statuses mean
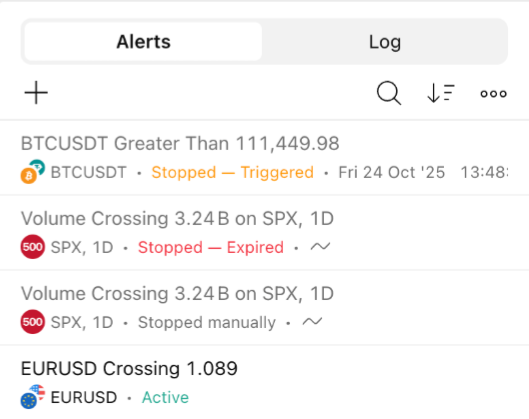
- Active — running and watching.
- Stopped — Triggered — an alert set to fire “Only once” has fired.
- Stopped manually — you paused it yourself.
- Stopped — Expired — it reached its expiry date.
Stuck anywhere? Message us on Telegram and we'll walk you through it.